


Using Depthkit OBJ Sequences in Depthkit Core and Houdini
In the tutorial below, you'll learn how to take an OBJ sequence exported from Depthkit and bring it into Houdini for further processing. You can either watch the tutorial video or use the text walkthrough below.
Before you start, download the tutorial asset (which is from a real live Depthkit project) and put it in the same hierarchy as your Houdini project.
NOTE: Mobile users will need to use a desktop computer to download this file.
( 1GB )
A note on FPS
OBJ sequences don’t have an FPS encoded that Houdini can interpret. If your Depthkit assets were exported at a different frame rate than your Houdini project’s frame rate, you have to be mindful to speed up/slow down how the $F (frame) variable is interpreted in the below use case.
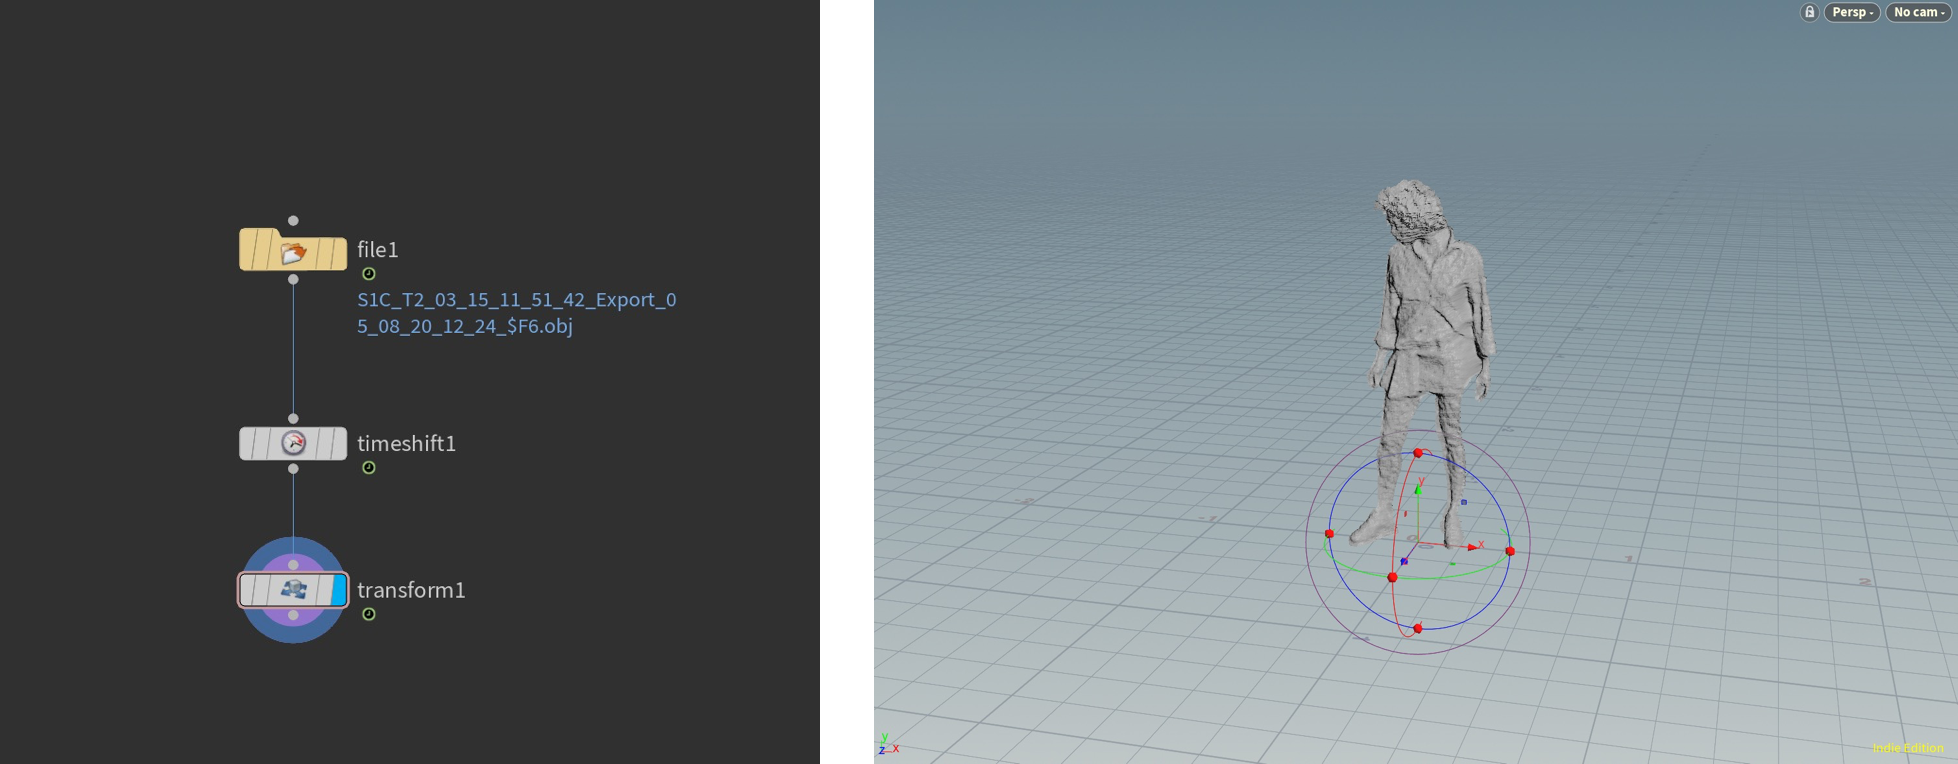
Importing a Depthkit asset into Houdini
1. Create an empty geometry node (using the TAB menu in the object panel).
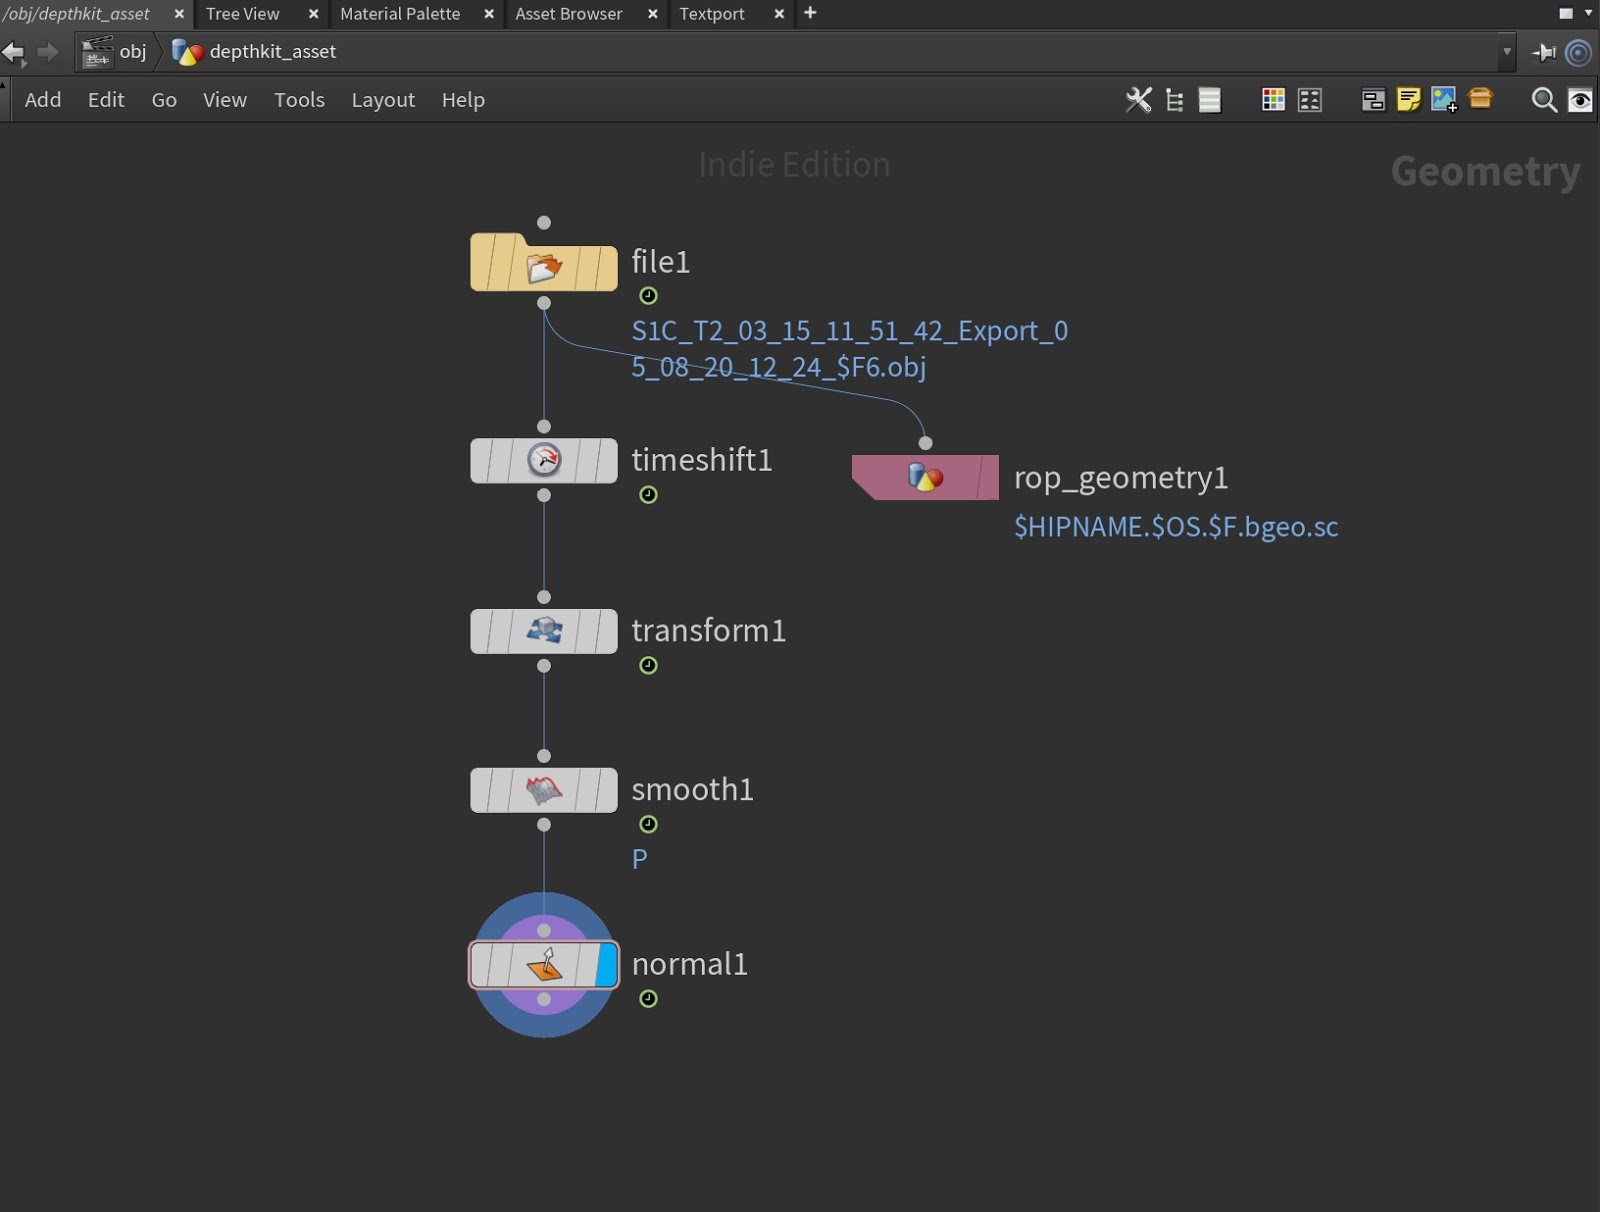
2. Dive into the geometry node and add a “File” node inside the geometry node.
3. In your new file node, select the “Geometry File” field and go to the file picker. Point the Geometry file to the tutorial OBJ sequence. Note that in the file picker you need to have “Show sequences as one entry” selected. Houdini will replace the frame number of your OBJ file with a $F6, the frame variable (with 6-zero padding).
4. The file node should throw an error! Houdini isn’t finding an OBJ file for frame 0, because this OBJ sequence starts on frame 1936. Depthkit supports exporting sequences that start at 1 (see image below) - but exporting sequences with the frame number included helps with audio sync.

It’s possible that your Houdini project won’t have the same frame range as your Depthkit assets, so you have two choices:
5a. Use the Houdini timeline UI (bottom of workspace) to adjust the Houdini frame range so it matches the Depthkit frame range. In this case if you set your start frame to 1936 and end frame to 2180 you can see the full range of the Depthkit asset. This may be appropriate if you’re planning to render your Depthkit assets in Houdini and bring them back into editing software where that frame range is important to keep consistent.
5b. A better solution is to use a Time Shift node to retime the Depthkit asset to match the Houdini project. This makes more sense if you already have a project built in Houdini and the Depthkit asset is being incorporated into a more Houdini-centric workflow.
Either way you’re faced with the problem that unlike most video editing software, OBJ sequences don’t come with a frame rate encoded, so you’re going to have to do some math to conform your Depthkit OBJ sequence to your Houdini project’s FPS. Let’s get started:
6. Retime your OBJ sequence: Add a Time Shift node after the File node.
7. Set your Time Shift node to be the final display/render SOP for the geometry object.
8. With the Time Shift node selected, click the “Frame” field name (not the entry field itself, but the name) to switch Houdini from displaying a frame number to the “$F” variable.
9. Change the Frame field to read “$F + 1935”
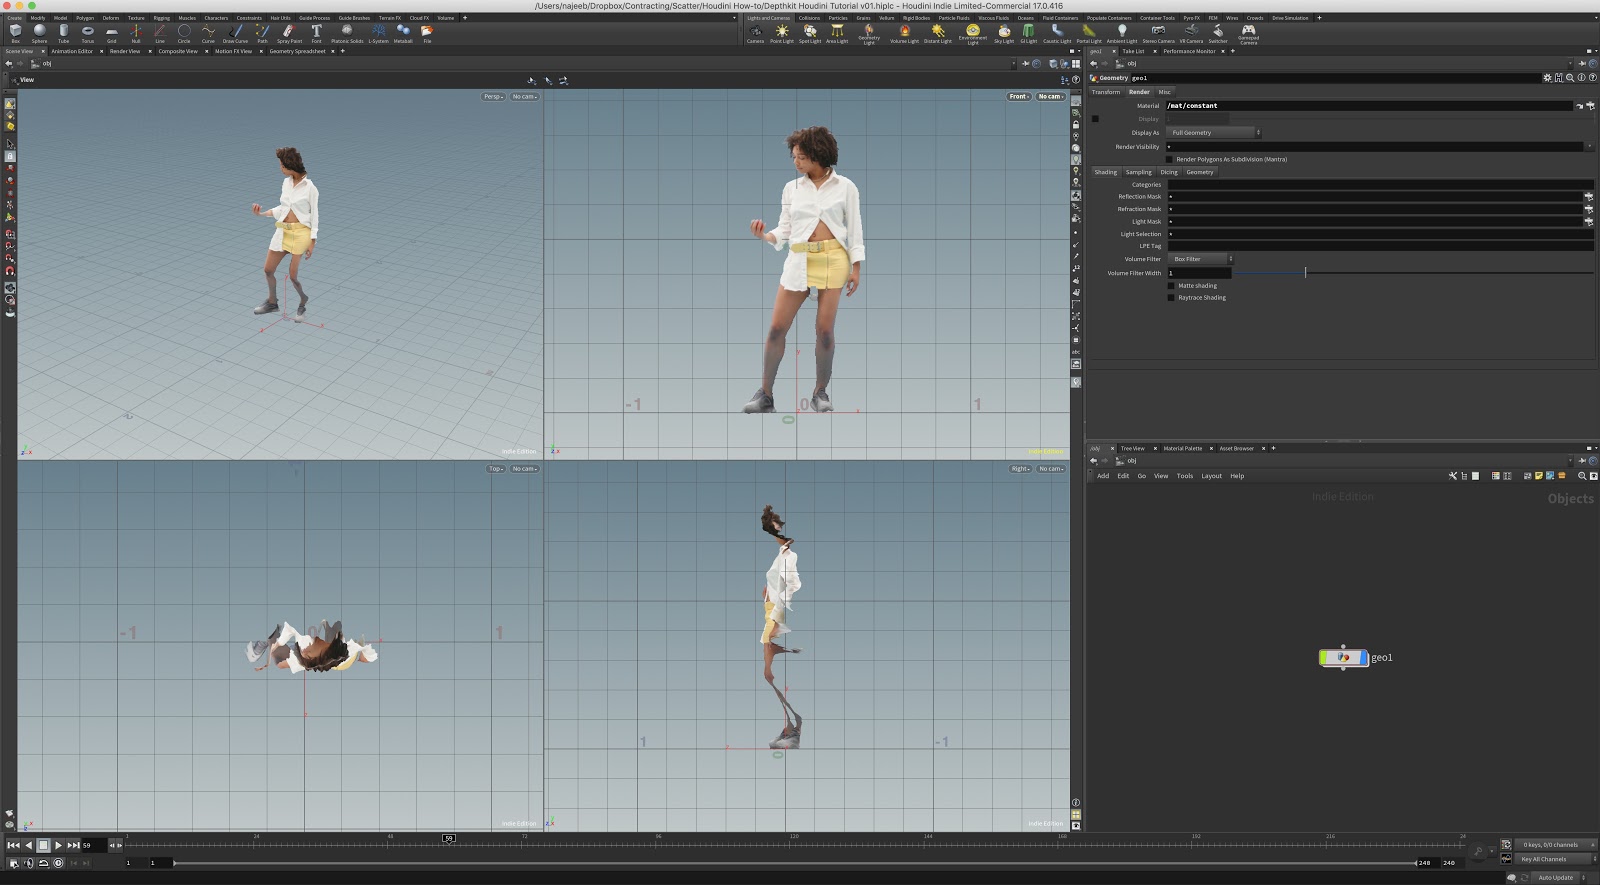
Now you should see geometry, but it’ll be gray because we haven’t assigned it a material yet. We’ll get to that in a second, but first:
10. Reposition your Depthkit asset so it’s centered on the origin: add a Transform SOP node after the File node and reposition them so they are centered on the origin with feet flat on the ground.
11. Add color: Next go to the “Material Palette” editor and add a “Constant” shader to your project. Let’s call it “depthkit_constant”
12. Go to the “Color Map” field on the new material and use the file picker to pick the PNG sequence that comes with your Depthkit asset.
13. Now go back to your object editor and assign “depthkit_constant” to your Depthkit object. Nothing happens! That’s because we also need to retime our PNG sequence, whose starting frame is also 1936.
14. The way to retime the Color Map field on our constant material is using VEX expressions contained within tic marks. You have to add 1935 to the $F variable in order for this string to evaluate to a frame that matches your time-shifted geometry. Change the end of your “Color Map” field on your depthkit_constant material so it looks like this:
S1C_T2_03_15_11_51_42_Export_05_08_20_12_24_`padzero(6,$F+1935)`.png
NB: The tic marks tell Houdini to evaluate a VEX expression in the middle of the string, so we can modify the $F variable. The ‘padzero’ function mimics the $F6 notation in the filename while allowing us to perform operations on $F. VEX ‘padzero’ documentation here.
15. Ok, now on frame 1 your material should be picking up the png from frame 1936 and you should be able to see your Depthkit asset with color mapping in Houdini. If you want to retime the FPS, you’ll have to change the frame calculation math on both your Time Shift SOP node in the Depthkit geometry object and the Color Map field in your constant material node.
Using lightable materials/relighting your Depthkit asset
1. In the above example we used a Constant material, which doesn’t respond to Houdini lights. This is so you can see your video/color data without modification from Houdini shaders.
2. To use a light-responsive material (eg Diffuse), simply apply the light-responsive material to your Depthkit geometry and change the Base Color Map property to match the Color Map property we specified above.
3. Add a light to your scene.
When you do this you’ll probably note that shadows reveal all the imperfections in the geometry – see below for tips on refining the geometry so that it can be relit.

Improving Depthkit geometry in Houdini
1. Try adding a Smooth SOP to your geometry to smooth it out.
2. The normals on your geometry coming out of Depthkit may not be correct – use a Normal SOP to recompute them to properly match your geometry.

Improve performance by baking your assets
1. Depthkit OBJ sequences are ASCII encoded and therefore read very slowly. I recommend baking these assets into Houdini’s bgeo format. In order to do this, go back to your Dephtkit geometry object and add a ROP Geometry Output node to the topmost “File". Bake your desired frame range.
2. Now add a new File node to your Depthkit geometry object and reference your newly baked files. Note that these new files will now have your Time Shift timing baked in. Juggling the separate retiming of your geometry and your PNG files requires being organized, I haven’t found a great way around it.
Things to watch out for
Avoid breaking UVs: Houdini offers a lot of SOPs that can manipulate the geometry Depthkit provides, but you may notice that some of them completely break the color map – this is because they may be modifying a very rigid set of UVs that changes considerably from frame to frame. In my experience UV modification doesn’t really work.
Things to try
Manipulate geometry: obviously this is what Houdini is great at – you can do all kinds of spatial and topological manipulation to your geometry, just be mindful that if you’re going to break the UV maps then the color data becomes mostly unusable.
Drive simulations off of your Depthkit geometry – very few pieces of software can handle per-frame geometry changes like Houdini. Try using your Depthkit asset as a collider in a water or smoke simulation to make your real life character interact with virtual visuals.
Thanks for reading our Depthkit + Houdini recipe! If you're looking for an easy way to start incorporating volumetric capture into your VFX workflows, we hope this page helped you get started. To learn more about how Depthkit works in VFX workflows, see our Depthkit for Visual Effects page here.