


VR Distribution Strategy: How to create a stereoscopic 360 version of your volumetric film
Reach new VR audiences
So you created a virtual reality experience. Congratulations! Now what?
A common and successful release strategy for a volumetric film is similar to the lifecycle of an independent film. First, you'll submit the project to film festivals. There, you'll show your story to the most engaged and receptive audiences. You can take advantage of the premiere to get reviews and press attention. Often, a festival will have access to high-end headsets and computers to display the highest quality version of your project.
After festivals, indie films tend to follow a windowing strategy, where they first hit theaters, then home video, then streaming platforms, and finally broadcast TV. Likewise, volumetric films can be licensed to VR cinemas, museums and art galleries, and then published for consumers on platforms like Oculus and Steam. Often, a release will be accompanied by an outreach campaign, particularly where the project has a social impact mission.
The catch is, of all the people that may love to see your story, very few have access to the equipment that festivals show work on. In movies, some cinephiles will see the blockbuster on a huge IMAX screen, while a much bigger audience will watch it streaming on their phones. For VR, having multiple formats that serve different audiences will give your experience the widest possible reach. The most accessible format is 360 video, as it can be viewed on any headset and even played in a browser.
Using the new AVPro2 video player, it's now possible to render out a stereoscopic 360 version of your Unity project containing Depthkit Studio assets, allowing you to deliver both 6DoF and 3DoF versions from the same source project. This guide shows you how.
Requirements
- Depthkit Combined-per-Pixel Assets (video & metadata)
- Unity 2019.4.x LTS
- Depthkit Studio Expansion Package Phase 6+
- AVPro 2.x
- Unity Recorder 2.5.5+ (installed from Unity Package Manager)
- Scatter's AV Pro 2.x Timeline Package Mod
Preparing Depthkit assets for offline rendering
The primary difference between real-time-ready assets and those for offline rendering is that the later is no longer bound by the performance optimizations needed for real-time playback, meaning you can use higher-resolution and higher-quality assets. Follow our asset encoding guide for best practices for high-quality assets.
Unity setup
Project setup
Create or open a new project in the pipeline of your choice.
To install AVPro2, open the Asset menu, and click Import Package > Custom Package..., select the AVPro2 Unity Package and click Open.
If you haven't yet done so, add the plugins from the Depthkit Studio Expansion Package Phase 6 in the Package Manager.
- depthkit.core
- depthkit.studio
- depthkit.avpro
- Any of the additional plugins needed for your render pipeline
- Import the appropriate Depthkit Studio prefab for your render pipeline.
Modifying & configuring AVPro 2
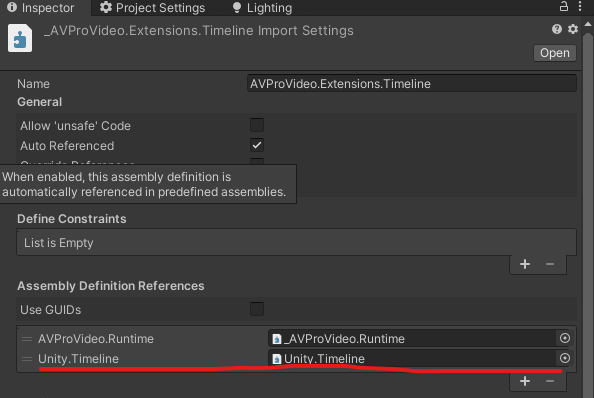
In the Project bin, navigate to Assets > AVProVideo > Extensions > Timeline and select _AVProVideo.Extensions.Timeline.asmdef
- In the Inspector, under Assembly Definition References, click the + button.
- Click the Object Picker in the newly generated field, and search for Unity.Timeline (Packages/com.unity.timeline/Runtime/Unity.Timeline.asmdef) and select it.
In Edit > Project Settings, under Player > Other Settings, enter AVPRO_PACKAGE_TIMELINE into the 'Scripting Define Symbols' field. This activates the AVPro 2.x timeline extension.

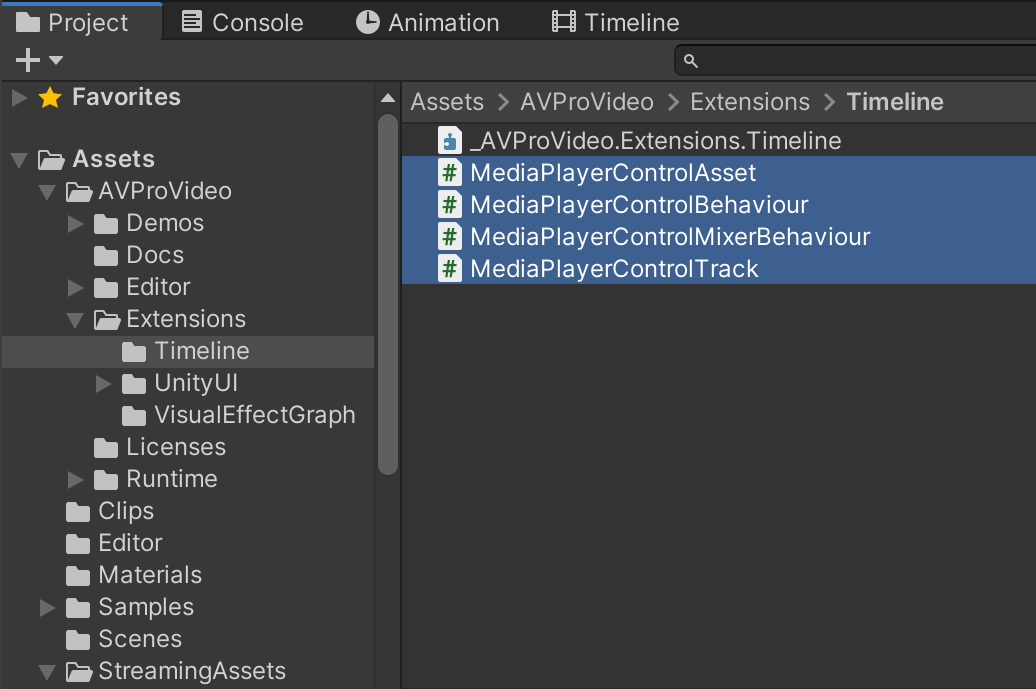
In the Project Bin in Assets > AVProVideo > Extensions > Timeline, replace the following with our forked versions found in the AV Pro 2.x Timeline Package Mod.
- MediaPlayerControlAsset.cs
- MediaPlayerControlBehaviour.cs
- MediaPlayerControlMixerBehavior.cs
- MediaPlayerControlTrack.cs
In the Project Bin in Assets > Editor, add the VideoCaptureSettingsWindow.cs file found in the Editor folder if the AV Pro 2.x Timeline Package Mod. Create the Editor folder in Assets if none exists.

Preparing Depthkit Clips
- Add Depthkit clip(s) to the project in Assets > Clips.
- Move the Combined-per-Pixel video(s) into StreamingAssets folder.
- Right-click in the Project Bin in Assets > Clips and click Create > AVProVideo > Media Reference.
- Link the Media Reference to your video clip by selecting the Media Reference, and in the Inspector, clicking "Browse..." and then selecting your video clip.
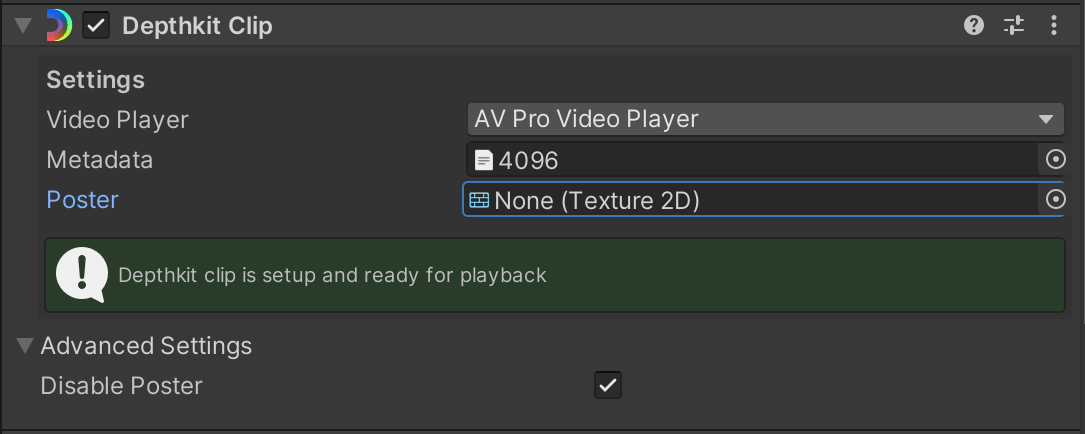
- Add the Depthkit prefab into the hierarchy, and select it.
- Under the Depthkit Clip component, change Video Player to 'AV Pro Video Player'.
- Drag the the metadata file for your clip into the 'Metadata' field.
- Under 'Advanced Settings', check the box for 'Disable Poster'
- Scroll down to the Media Player component. Click the folder button, and select your Depthkit clip from Media References.
- Disable Auto Open and Auto Play.

Preparing the Timeline
Create an empty Game Object. Select it.
In the Timeline pane, click the Create, and save it in your Assets folder.
Create a Media Player Control Track.

Create a clip for the track by adding from Media Reference.

Choose your Depthkit clip Media Reference from the available references.
Extend region in the timeline to match the full clip.

Drag the Depthkit object in the hierarchy onto the Media Player Control Track to link the Depthkit media player to the Timeline.

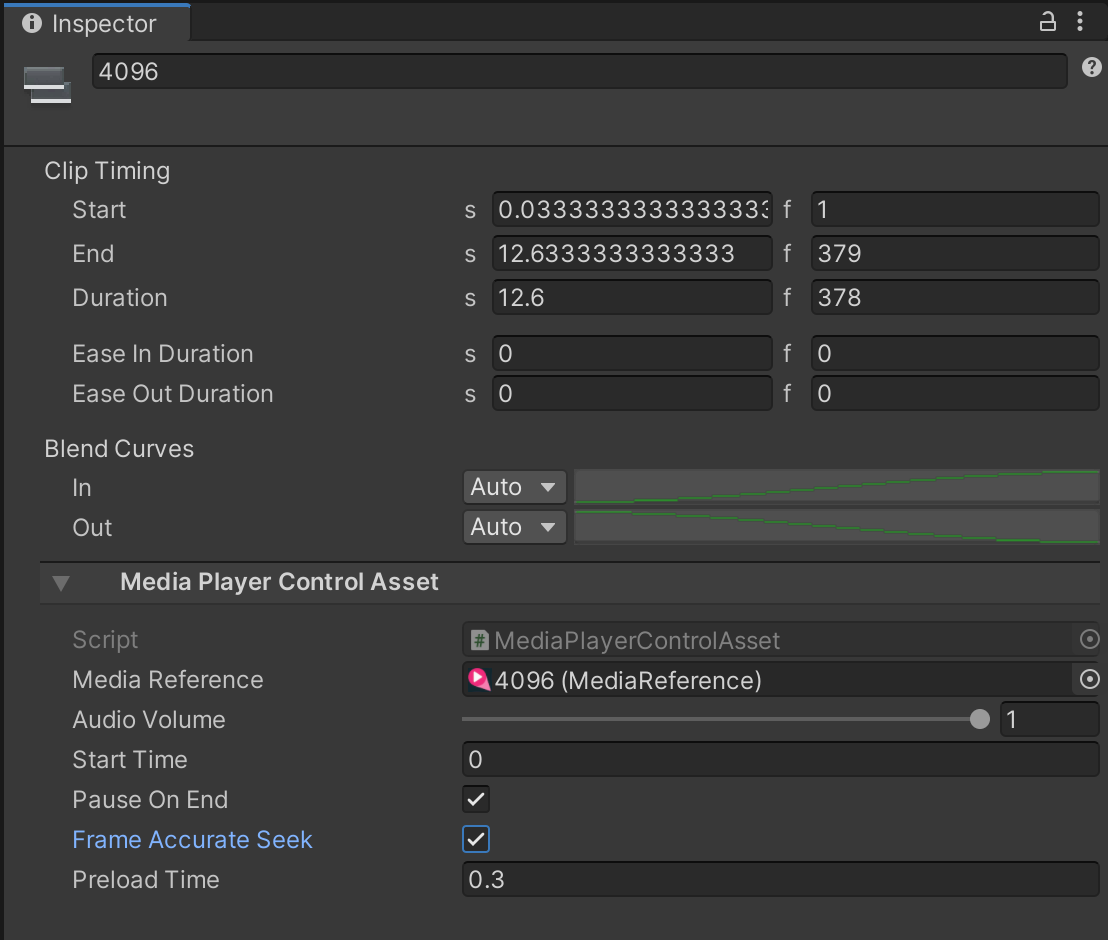
With the timeline clip region selected, in the Inspector:
- Enter 0 into the Start field.
- Enable Frame Accurate Seek to ensure recorder advances in lockstep with the video on the timeline.
- The preload time can be used to load your video clip ahead of time to ensure smooth playback on start. Be sure the media player's GO is enabled at the time the preload hits on the timeline.
To globally apply this setting to all AVPro Playables on a timeline or nested timelines, click the Capture menu made available by the VideoCaptureSettingsWindow.cs script above, and click Video Capture.
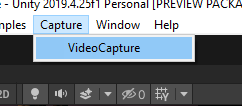
Drag the highest level timeline or any timeline with media control asset clips on it into the capture settings window's playable director slot:
Now the list in the widow will say which clips are enabled or disabled for frame accurate playback. Press the Toggle button until they all match your desired playback accuracy. It's best to have them all true or all false, not a mix.
- true for 360 Rendering
- false for Real-Time 6DoF Builds
Preparing Unity recorder
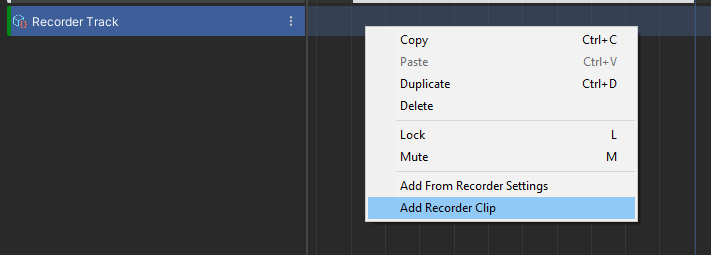
With your main timeline selected, in the Timeline pane, right-click in the left area of the pane and select UnityEditor.Recorder.Timeline > Recorder Track.

Right-click in the right area of the pane and select Add a Recorder Clip.
Adjust the beginning and end of the Recorder Clip on the timeline to determine which section of your timeline is recorded.
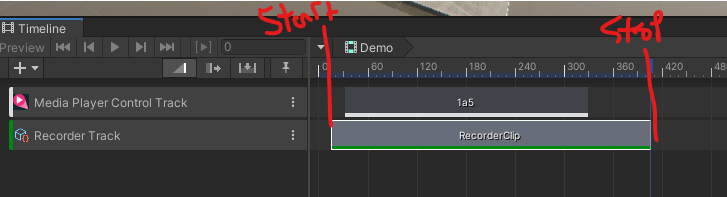
Select the recorder clip on the timeline, and in the Inspector, set the following settings.
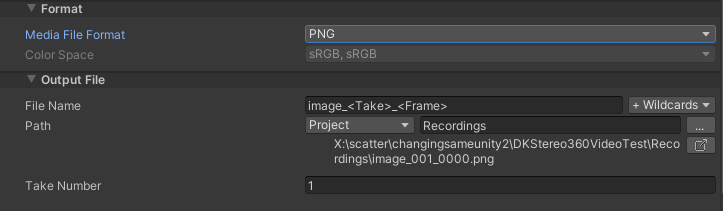
Recorder clips:
- Recorder: Image Sequence
Capture:
- Source: 360 View
- Camera: Main Camera (or a tagged camera of your choosing)
- Output Dimensions: W 4096 H 4096
- Cubemap Size: 2048 - This should be at least the vertical resolution of each eye. In the case of 4096 x 4096 (stereo top-bottom), this is 2048 as each eye is 4096 x 2048.
Format:
- Media File Format: PNG is higher quality, JPG will produce smaller files.
Output file:
- Path: To prevent Unity from slowing down as it adds each exported frame to the Project, select an output destination outside of your Unity project folder. Exporting to an SSD will go faster than to an HDD. Make sure there's plenty of space on the drive as well.
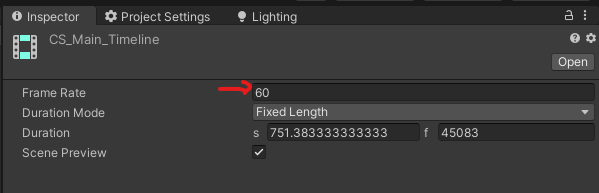
Note that the 360 recording framerate will be determined by the FPS of the timeline asset itself (this asset must contain the Unity Recorder Clip).
Press Play in the editor to start playback and once this clip beings, the recording will start.
Visual effects and render pipeline considerations
VFX Graph
The Unity Recorder will frame step the application so VFX Graph will always remain in sync.
However, if using particle effects like point sprites or trails billboarded along the camera plane be aware that the billboarding will be in reference to the face of the cubemap it was visible from, not live from the viewer's perspective, meaning that the particles may look slightly tilted and will have sift directions as they cross from one face to another.
Post processing
Some post processing effects will give undesired results when the faces of the cube map are stitched together. Never use vignette or chromatic aberration.
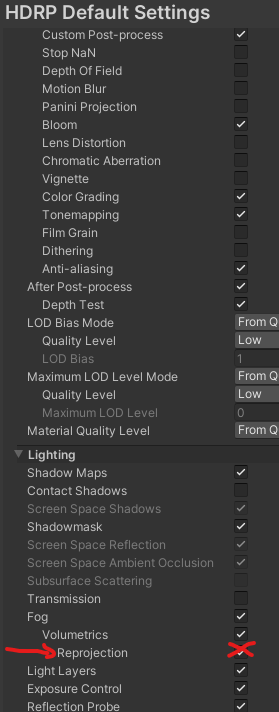
Volumetric lighting with Reprojection
Using Reprojection with volumetric lights does give a better looking result when running in 6DoF but will cause harsh artifacts when capturing 360. Disable Reprojection for the best results.
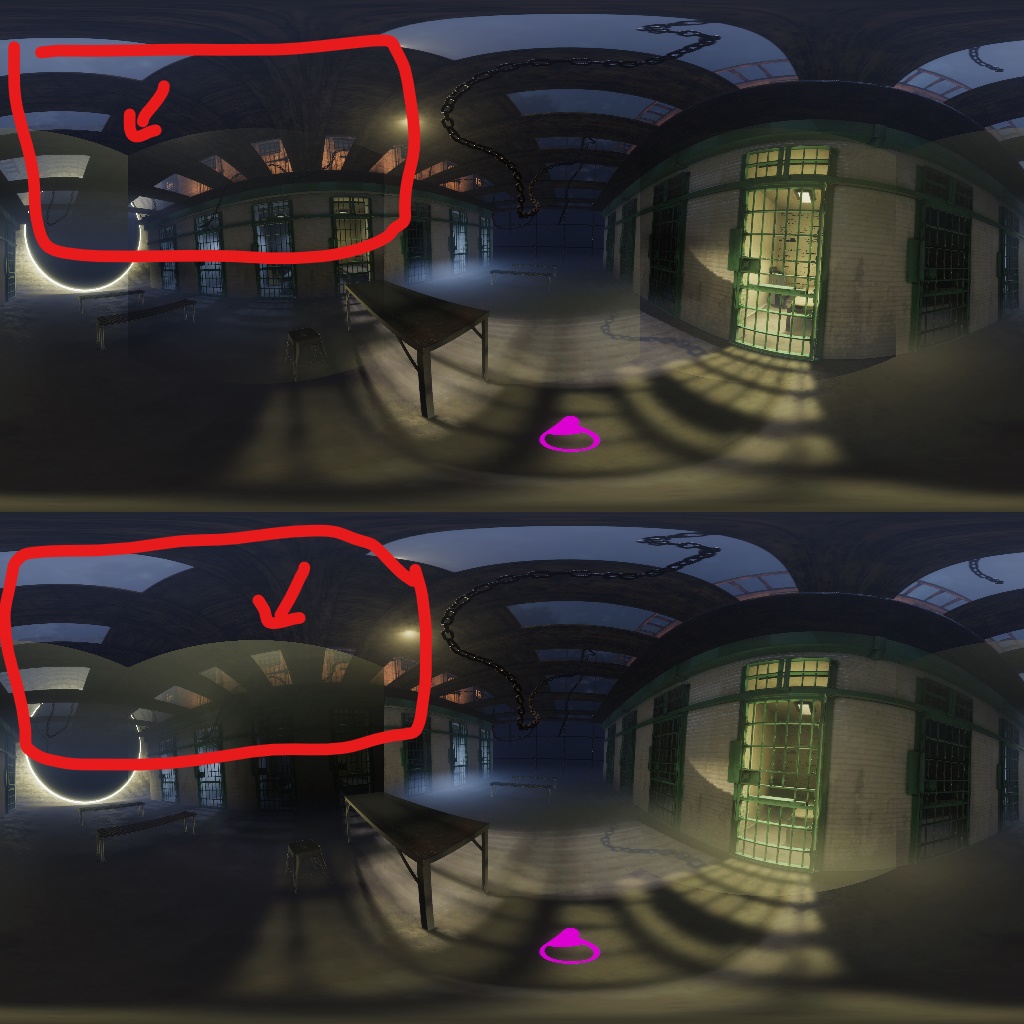
Bloom
Bloom is another screen space effect that can cause issues over camera boundaries. If an object contributing to bloom is highly visible near an edge and not visible from an adjacent camera (as in the image below) the bloom with be strong on one cubeface and non-existant on the other causing this harsh line in the 360 capture.
To fix, either dial down bloom settings, disable bloom all together (globally or locally) or attempt a bespoke post processing stack post 360 capture and manually composite.

Encoding 360 Video
H.264
Currently, unless we have full control of target hardware, H.264 is still the most widely supported video codec to use. It is not ideal because it only supports 8 bit color and is not designed for the higher resolutions required for 360 video, and is not as efficient as current state of the art codecs like H.265, VP9 or AV1.
The resolutions required for high quality 360 video are technically outside of the H.264 Level 5.2 spec for resolution, however many hardware accelerated devices are able to support these resolutions, but are still constrained to other 5.2 spec limitations, such as motion vector range. For this reason, when encoding high resolution H.264 with ffmpeg it is necessary to force the motion vector range into the appropriate range, as ffmpeg defaults to level 6 specifications at higher resolutions. The out-of-spec motion vector range leads to artifacts at decode time on most decoders.
Encoding with FFmpeg
ffmpeg -r 60 -i ./image_001_%05d.png -vf scale=out_color_matrix=bt709:out_range=full -colorspace bt709 -color_primaries bt709 -color_trc bt709 -color_range pc -c:v libx264 -x264opts mvrange=511 -crf 16 -pix_fmt yuv420p output_360.mp4
Command breakdown
-vf scale=out_color_matrix=bt709:out_range=full
- Adds the scale video filter, telling it to use the bt709 color matrix and full color range. By default ffmpeg will use the bt601 color space, and limited range (and by default it does not include that in the metadata!). The bt709 color space is a wider gamut than bt601, meaning colors will be better represented, and most decoders assume bt709 if no metadata is present, and some assume bt709 even if metadata is present. Full color range is important to preserve detail in dark and light areas, and helps mitigate color banding in dark gradients.
-colorspace bt709 -color_primaries bt709 -color_trc bt709 -color_range pc
- Adds the metadata for the bt709 color space, as well as full color range metadata. Note that these flags ONLY set metadata, but are not involved in the RGB → YUV conversion (that is what the above video filter is for). Again, by default ffmpeg does not include this metadata, so it must be set manually.
-x264opts mvrange=511
- Defines the motion vector range parameter, as described above, to stay within the H.264 Level 5.2 spec (below 512). This is critical to avoid decompression artifacts.
-pix_fmt yuv420p
- Specifies the YUV 4:2:0 chroma sub-sampling pixel format. By default ffmpeg will use a higher quality 4:2:2 pixel format when possible, though this is not widely supported by many decoders.
H.265
If the target hardware is supports it, H.265 is a much better choice. Currently the Quest 1 and 2 support H.265 natively, but at different resolutions/framerates. The following article lists the hardware capabilities: https://creator.oculus.com/blog/encoding-high-resolution-360-and-180-video-for-oculus-go/
10-bit vs 8-bit color
One of the biggest improvements H.265 has in terms of visual quality is the ability to support higher bit depths than H.264, which is limited to 8 bit YUV. 8-bit video suffers from poor color reproduction in darker areas, and poorer color reproduction in general than 10-bit.
If the target hardware and delivery platform supports it, 10 bit color is much higher quality, however there can be issues with preserving 10 bit color if there are transcoding steps in the delivery platform's pipeline.
Encoding with FFmpeg
ffmpeg -r 60 -i ./image_001_%05d.png -crf 15 -pix_fmt yuv420p10le -color_range pc -c:v libx265 output_360.mp4
Command breakdown
-c:v libx265
- Specifies the H.265 encoder via libx265
-pix_fmt yuv420p10le
- Specifies a 10-bit YUV 4:2:0 pixel format
- Change this to yuv420p for 8-bit encodes
-color_range pc
- We've found that with 10-bit color H.265, full color range is important in maintaining the original color; without this flag, the colors come out too dark.
Embedding spatial audio
This is a tool included with Spatial Workstation that can take 360 videos and spatialized audio and transcode and remux to a few different 360 video formats. Download here ↓
Get the Spatial Workstation (AAX) and (AAX addons).
On windows, you will need a custom version of FFMPEG, as their installer fails during that step.
Follow these instructions to get it compiled.
Following these instructions to install Python 2.7 and MP4Box.
Spatial audio
The FB360 Encoder transcodes a number of multi channel spatial audio formats into chosen destination format. This is fairly opaque from the tool and documentation about what the exact channel layouts of the output formats are.
The spatial workstation can output different spatial audio formats. For the highest quality, we recommend using "B-format (3rd order ambiX)" which is a 16-channel .wav file.
In addition to spatialized audio, an optional head-locked stereo .wav file may be provided.
These input 16 or 18 channels are mixed down to a smaller number of channels in the final video, depending on the output format. For the two formats described below, 8.2 TBE is the final channel layout used.
Output formats
Facebook 360 Video
This is the format used by Oculus Media Studio. Note that when deploying to Oculus Media Studio, the video will be re-encoded to a few different versions in order to support different target hardware. If this is the ultimate destination, the video uploaded to Oculus should have a higher bitrate than you would normally want to use, as they handle re encoding and bitrates automatically.
This format also works on the quest natively by loading the video file directly onto the device! Follow these instructions to copy the video to your device.
Note: These instructions mention the Oculus Video app, but it is now called Oculus TV.
Note: while the Quest does support H265 with 10 bit color via sideloading, Oculus Media Studio does not properly handle 10 bit color in the streamed versions, and will result in glitched videos on Quest 2. Strangely, Quest 1 plays back 10 Bit videos from Oculus Media Studio just fine.
Experimental → FB360 Matroska (spatial workstation 8 channel)
Use this for AVPro 360 playback compatibility.
https://www.renderheads.com/content/docs/AVProVideo/articles/feature-360audio.html
The documentation makes it sound like other formats are possible to use, but in practice, this is the only supported format where the spatialized audio comes through properly.